Tutorial Cara ESP32 Android Web Menyalakan Lampu Led (Blink Led) Mudah
Tutorial ESP32 Mudah Membuat Blink Led dengan HP Android WEB

Kali ini mimin bahas Mengenai ESP32 apa itu ESP32 adalah micro controller Board didalamnya ada Chipset, wifi, Bluetooth dll kumplit dah fitur walau kecil bentuknya kurang lebih kaya Arduino tapi lebih simple menurut mimin ESP32 lanjutan dari esp8266 nah yang 8266 ini cuman ada Bluetooth aja buat konektivitas Esp kepanjangan dari Espressif oke lanjut ke projek Blink 2 Led simple web ini...
Bahan / Alat :
1. ESP32
2. 2 lampu Led
3. Micro usb
4. Breadboard / papan Board
5. Kabel jumper
6. Resistor 300
7. Program / software Arduino Ide Download
Untuk jelasnya lihat Gambar Bahan/Alat :


*Catatan :
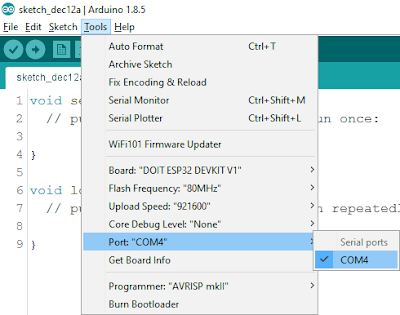
6. Pilih Board ESP32 devkit (sesuaikan Board ESP32 kalian) di menu tools

7. Pilih com Serial bebas yg aktif di menu tools
8. Klik Tanda panah kanan terus tunggu saat proses compile+install apabila ada warning waiting connection ......
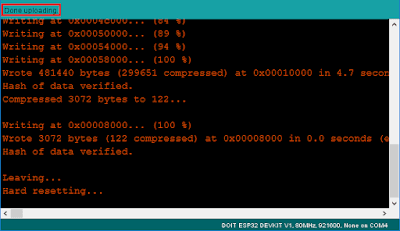
Tekan tombol "Boot" di ESP32 tunggu sampai proses berjalan lalu tunggu sampai selesai

9. Buka Tools lihat Serial monitor lalu klik tombol "En" / nyalakan ulang sampai konek ke Akses Point kita nah disini aktifkan Thetering di HP Android Kalian dulu isi Nama Thetering/AP sesuai nama pada source code misal "ESP32" dengan Password sama juga "12345678" ok buat koneksi Thetering di HP Android tunggu sampai ada Koneksi masuk dari Client ESP32 Lihat Alamat Ip Address kaya misal 192.168.xx.xx

10. Apabila sudah tersambung antar Esp dan Hp Android buka Web / Chrome ketik url alamat Ip Address tadi yang di Serial Monitor misal 192.168.xx.xx seperti gambar dibawah ini


by : gameandroidoff.blogspot.com

Kali ini mimin bahas Mengenai ESP32 apa itu ESP32 adalah micro controller Board didalamnya ada Chipset, wifi, Bluetooth dll kumplit dah fitur walau kecil bentuknya kurang lebih kaya Arduino tapi lebih simple menurut mimin ESP32 lanjutan dari esp8266 nah yang 8266 ini cuman ada Bluetooth aja buat konektivitas Esp kepanjangan dari Espressif oke lanjut ke projek Blink 2 Led simple web ini...
Bahan / Alat :
1. ESP32
2. 2 lampu Led
3. Micro usb
4. Breadboard / papan Board
5. Kabel jumper
6. Resistor 300
7. Program / software Arduino Ide Download
Untuk jelasnya lihat Gambar Bahan/Alat :

Langkah Tutorial perakitan :
1. Pasang ESP32 ke breadboard posisi sesuaikan

Lebih jelasnya seperti diagram
2. Pasang Kabel jumper seperti diagram dibawah ini

3. Sambungkan micro usb kabel ke ESP32 konek ke pc
4. Buka Arduino Ide yang sudah di download&install tadi

5. Klik new terus copy semua source code dibawah ini ke Arduino Ide coding Area :
/*********
  HpRetro
  Complete project details at http://Hpretro.me
*********/
// Load Wi-Fi library
#include <WiFi.h>
// Replace with your network credentials
const char* ssid     = "ESP32";
const char* password = "12345678";
// Set web server port number to 80
WiFiServer server(80);
// Variable to store the HTTP request
String header;
// Auxiliar variables to store the current output state
String output26State = "off";
String output27State = "off";
// Assign output variables to GPIO pins
const int output26 = 26;
const int output27 = 27;
void setup() {
  Serial.begin(115200);
  // Initialize the output variables as outputs
  pinMode(output26, OUTPUT);
  pinMode(output27, OUTPUT);
  // Set outputs to LOW
  digitalWrite(output26, LOW);
  digitalWrite(output27, LOW);

  // Connect to Wi-Fi network with SSID and password
  Serial.print("Connecting to ");
  Serial.println(ssid);
  WiFi.begin(ssid, password);
  while (WiFi.status() != WL_CONNECTED) {
    delay(500);
    Serial.print(".");
  }
  // Print local IP address and start web server
  Serial.println("");
  Serial.println("WiFi connected.");
  Serial.println("IP address: ");
  Serial.println(WiFi.localIP());
  server.begin();
}
void loop(){
  WiFiClient client = server.available();   // Listen for incoming clients

  if (client) {                             // If a new client connects,
    Serial.println("New Client.");          // print a message out in the serial port
    String currentLine = "";                // make a String to hold incoming data from the client
    while (client.connected()) {            // loop while the client's connected
      if (client.available()) {             // if there's bytes to read from the client,
        char c = client.read();             // read a byte, then
        Serial.write(c);                    // print it out the serial monitor
        header += c;
        if (c == '\n') {                    // if the byte is a newline character
          // if the current line is blank, you got two newline characters in a row.
          // that's the end of the client HTTP request, so send a response:
          if (currentLine.length() == 0) {
            // HTTP headers always start with a response code (e.g. HTTP/1.1 200 OK)
            // and a content-type so the client knows what's coming, then a blank line:
            client.println("HTTP/1.1 200 OK");
            client.println("Content-type:text/html");
            client.println("Connection: close");
            client.println();

            // turns the GPIOs on and off
            if (header.indexOf("GET /26/on") >= 0) {
              Serial.println("GPIO 26 on");
              output26State = "on";
              digitalWrite(output26, HIGH);
            } else if (header.indexOf("GET /26/off") >= 0) {
              Serial.println("GPIO 26 off");
              output26State = "off";
              digitalWrite(output26, LOW);
            } else if (header.indexOf("GET /27/on") >= 0) {
              Serial.println("GPIO 27 on");
              output27State = "on";
              digitalWrite(output27, HIGH);
            } else if (header.indexOf("GET /27/off") >= 0) {
              Serial.println("GPIO 27 off");
              output27State = "off";
              digitalWrite(output27, LOW);
            }

            // Display the HTML web page
            client.println("<!DOCTYPE html><html>");
            client.println("<head><meta name=\"viewport\" content=\"width=device-width, initial-scale=1\">");
            client.println("<link rel=\"icon\" href=\"data:,\">");
            // CSS to style the on/off buttons
            // Feel free to change the background-color and font-size attributes to fit your preferences
            client.println("<style>html { font-family: Helvetica; display: inline-block; margin: 0px auto; text-align: center;}");
            client.println(".button { background-color: #4CAF50; border: none; color: white; padding: 16px 40px;");
            client.println("text-decoration: none; font-size: 30px; margin: 2px; cursor: pointer;}");
            client.println(".button2 {background-color: #555555;}</style></head>");

            // Web Page Heading
            client.println("<body><h1>ESP32 Web Server</h1>");

            // Display current state, and ON/OFF buttons for GPIO 26
            client.println("<p>GPIO 26 - State " + output26State + "</p>");
            // If the output26State is off, it displays the ON button
            if (output26State=="off") {
              client.println("<p><a href=\"/26/on\"><button class=\"button\">ON</button></a></p>");
            } else {
              client.println("<p><a href=\"/26/off\"><button class=\"button button2\">OFF</button></a></p>");
            }

            // Display current state, and ON/OFF buttons for GPIO 27
            client.println("<p>GPIO 27 - State " + output27State + "</p>");
            // If the output27State is off, it displays the ON button
            if (output27State=="off") {
              client.println("<p><a href=\"/27/on\"><button class=\"button\">ON</button></a></p>");
            } else {
              client.println("<p><a href=\"/27/off\"><button class=\"button button2\">OFF</button></a></p>");
            }
            client.println("</body></html>");

            // The HTTP response ends with another blank line
            client.println();
            // Break out of the while loop
            break;
          } else { // if you got a newline, then clear currentLine
            currentLine = "";
          }
        } else if (c != '\r') {  // if you got anything else but a carriage return character,
          currentLine += c;      // add it to the end of the currentLine
        }
      }
    }
    // Clear the header variable
    header = "";
    // Close the connection
    client.stop();
    Serial.println("Client disconnected.");
    Serial.println("");
  }
}
const char* ssid = "ESP32";ESP32 bisa di ganti dengan ssid kalian bebas sama 12345678 password juga bebas
const char* password = "12345678";
6. Pilih Board ESP32 devkit (sesuaikan Board ESP32 kalian) di menu tools

7. Pilih com Serial bebas yg aktif di menu tools

8. Klik Tanda panah kanan terus tunggu saat proses compile+install apabila ada warning waiting connection ......
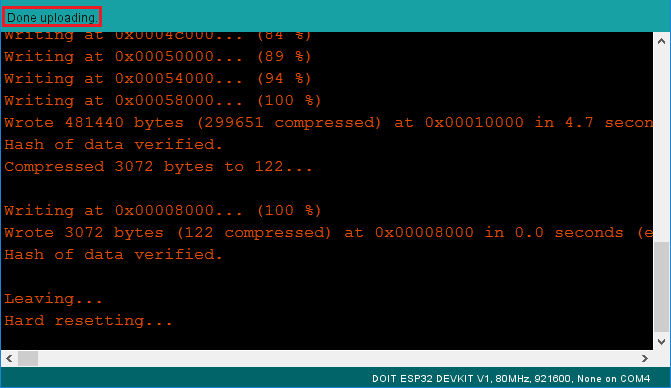
Tekan tombol "Boot" di ESP32 tunggu sampai proses berjalan lalu tunggu sampai selesai

9. Buka Tools lihat Serial monitor lalu klik tombol "En" / nyalakan ulang sampai konek ke Akses Point kita nah disini aktifkan Thetering di HP Android Kalian dulu isi Nama Thetering/AP sesuai nama pada source code misal "ESP32" dengan Password sama juga "12345678" ok buat koneksi Thetering di HP Android tunggu sampai ada Koneksi masuk dari Client ESP32 Lihat Alamat Ip Address kaya misal 192.168.xx.xx

10. Apabila sudah tersambung antar Esp dan Hp Android buka Web / Chrome ketik url alamat Ip Address tadi yang di Serial Monitor misal 192.168.xx.xx seperti gambar dibawah ini

11. Selesai

Video testing:
by : gameandroidoff.blogspot.com


Comments
Post a Comment